Difference between revisions of "Print from Mac"
From ITSwiki
| [unchecked revision] | [unchecked revision] |
(Created page with "# apple_diagram_2.gifLocate the printer you wish to add to your system from the list of printers and remember (or copy) the nam...") |
m |
||
| Line 1: | Line 1: | ||
| − | + | [[Image:46-apple_diagram_2.gif|apple_diagram_2.gif]] | |
| + | |||
| + | # Locate the printer you wish to add to your system from the [[Printing | list of printers]] and remember (or copy) the name of the printer which is found in the left most column. In this example we will go with cp321111a which is located in building 321 room 111. | ||
# Open "System preferences" (located in the "Applications" folder) | # Open "System preferences" (located in the "Applications" folder) | ||
# Click "Print & Fax" which opens the dialog to add a printer. Click the '+' in the lower left corner to add a printer. [[Image:65-macprint1%20_1_.png|macprint1 (1).png]] | # Click "Print & Fax" which opens the dialog to add a printer. Click the '+' in the lower left corner to add a printer. [[Image:65-macprint1%20_1_.png|macprint1 (1).png]] | ||
| Line 12: | Line 14: | ||
# Click "Continue" | # Click "Continue" | ||
| − | To see a video tutorial on how to add a printer click [[media:49-addprintertomac _1_.swf | | + | To see a video tutorial on how to add a printer click [[media:49-addprintertomac _1_.swf | here]] |
The printer is now added and ready to print to. | The printer is now added and ready to print to. | ||
Revision as of 12:15, 11 June 2012

- Locate the printer you wish to add to your system from the list of printers and remember (or copy) the name of the printer which is found in the left most column. In this example we will go with cp321111a which is located in building 321 room 111.
- Open "System preferences" (located in the "Applications" folder)
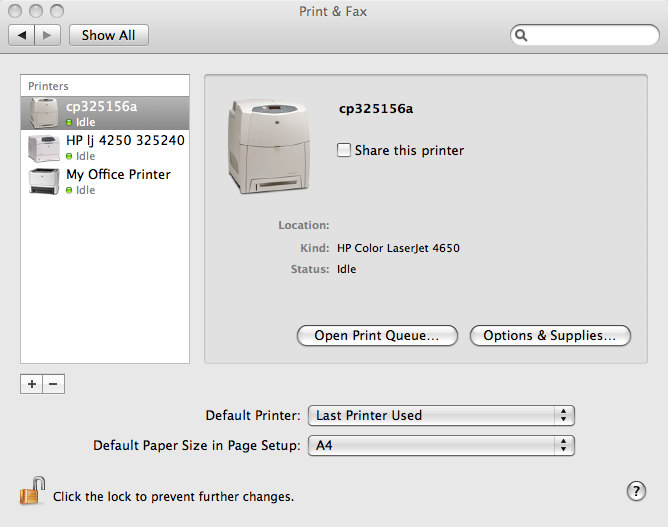
- Click "Print & Fax" which opens the dialog to add a printer. Click the '+' in the lower left corner to add a printer.
- At the top of the dialog popping up choose "IP" af the type of printer to add. Then specify the following paramters in the dialog:
- Protocol: Line Printer Daemon - LPD
- Address: cups.imm.dtu.dk
- queue: cp321111a (or whatever printer you chosed from the list of printers)
- Name: HP Colour Laserjet 4700 321111 (this is the name you will see when choosing printer. It is just a description so you can put whatever suits you best)
- Location: 321-111 (an optional description for the physical location of the printer)
- Print Using: Choose the driver for the specific model (if not available try and use the generic postscript driver)
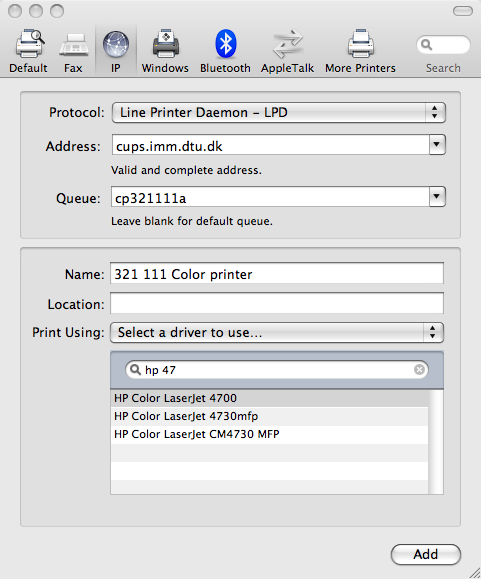
- Click "add" and configure possible features for the printer (most often duplex)and set "Paper Matching" option to "Nearest Size & Scale"
macprint3.png - Click "Continue"


To see a video tutorial on how to add a printer click here
The printer is now added and ready to print to.