Difference between revisions of "Print from Mac"
| [unchecked revision] | [unchecked revision] |
m |
m |
||
| Line 1: | Line 1: | ||
UPDATED GUIDE FOR INSTALLING PRINTERS [[File:Guide.pdf]] | UPDATED GUIDE FOR INSTALLING PRINTERS [[File:Guide.pdf]] | ||
| − | |||
| − | |||
----------------------------------------------- | ----------------------------------------------- | ||
| − | |||
| − | |||
| − | |||
| − | |||
| − | |||
| − | |||
| − | |||
| − | |||
| − | |||
| − | |||
| − | |||
| − | |||
| − | |||
| − | |||
| − | |||
| − | |||
| − | |||
| − | |||
| − | |||
| − | |||
| − | |||
| − | |||
| − | |||
| − | |||
| − | |||
| − | |||
| − | |||
| − | |||
| − | |||
| − | |||
| − | |||
=== '''Optional method for adding network printers''' === | === '''Optional method for adding network printers''' === | ||
Revision as of 10:29, 12 November 2018
UPDATED GUIDE FOR INSTALLING PRINTERS File:Guide.pdf
Optional method for adding network printers
This is not a fully supported way of adding printers to a Mac (mostly for non-domain computers), as it cannot guarantee that all printing features will be available (i.e. stapling might not work). For further assistance using the optional procedure please contact IT-support.
It will use another print server (CUPS), and will require that a universal or specific printer driver has already been downloaded and unpacked or already installed on you computer (**)
Find the name of the printer you want to add. CUPS printer names does NOT start with "comp-". Printer list can be found here
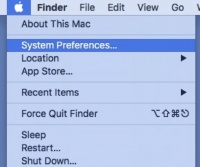
Open System Preferences (under the Apple Logo) for adding printer.
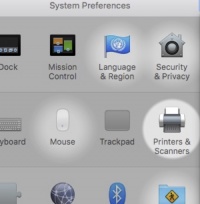
Click Printers & Scanners.
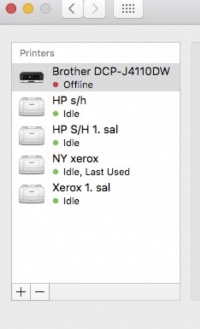
Click "Add a printer" (the PLUS sign).
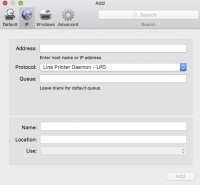
Click IP.
Enter the Adresse of the CUPS server: cups.compute.dtu.dk (which is then accepted as a "valid and complete hos name or address.")
Enter the printer in the Queue: example "bp322206a" and set the Protocol to LPD.
Now issue a name for the printer and a location if you like.
Choose the Generic Postscript Driver (do not use a PCL drive because colours are not supported)
Click "Add"
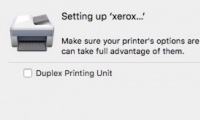
After a period the Setting up-procedure offers an opportunity to add a Duplex Printing Unit. Apply if available.
Press OK and the printer is now added and ready to print to.
