Difference between revisions of "Print from Mac"
From ITSwiki
| [unchecked revision] | [unchecked revision] |
m |
|||
| Line 1: | Line 1: | ||
[[Image:46-apple_diagram_2.gif|apple_diagram_2.gif]] | [[Image:46-apple_diagram_2.gif|apple_diagram_2.gif]] | ||
| − | # Locate the printer you wish to add to your system | + | # Locate the printer you wish to add to your system and remember the name of the printer. In this example we will go with cp321111a which is located in building 321 room 111. |
# Open "System preferences" (located in the "Applications" folder) | # Open "System preferences" (located in the "Applications" folder) | ||
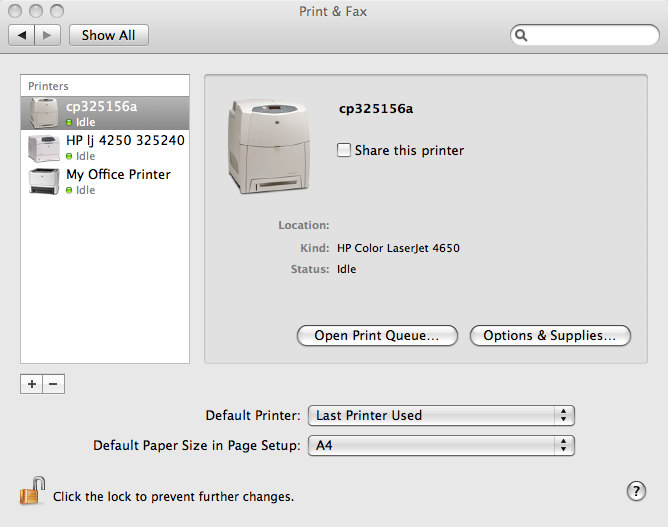
# Click "Print & Fax" which opens the dialog to add a printer. Click the '+' in the lower left corner to add a printer. [[Image:65-macprint1%20_1_.png|macprint1 (1).png]] | # Click "Print & Fax" which opens the dialog to add a printer. Click the '+' in the lower left corner to add a printer. [[Image:65-macprint1%20_1_.png|macprint1 (1).png]] | ||
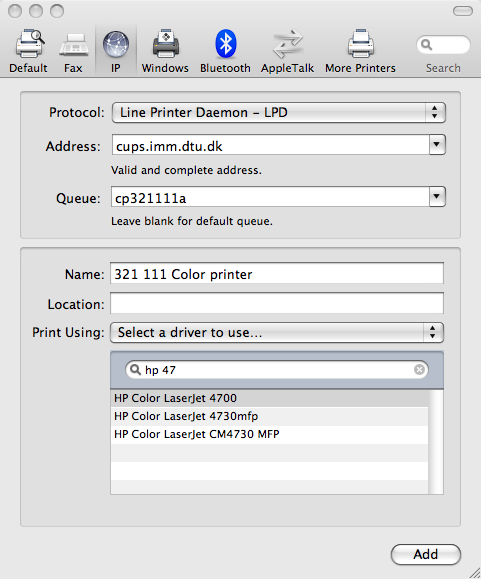
| − | # At the top of the dialog popping up choose " | + | # At the top of the dialog popping up choose "WINDOWS" af the type of printer to add. Then specify the following paramters in the dialog: |
| − | ## | + | ## Domain: win |
| − | ## | + | ## Server: comp-winprint |
| − | ## | + | ## Authenticate: use your ID and Password as if you where connecting to the Portal |
| − | ## | + | ## You will then see a list of all printers connected to our network. |
| − | ## | + | ## Find the one you want to add, and click Add in the lower right corner of the Window. |
| − | ## Print Using: Choose the driver for the specific model (if not available try and use the generic postscript driver) [[Image:66-macprint2%20_1_.png|macprint2 (1).png]] | + | ## You can add the Location if you like. |
| + | ## Print Using: Choose the driver for the specific model (if not available try and use the generic postscript driver) | ||
| + | # The server [[Image:66-macprint2%20_1_.png|macprint2 (1).png]] | ||
# Click "add" and configure possible features for the printer (most often duplex)and set "Paper Matching" option to "Nearest Size & Scale"<br />[[Image:67-macprint3.png| 500x300px |macprint3.png]] | # Click "add" and configure possible features for the printer (most often duplex)and set "Paper Matching" option to "Nearest Size & Scale"<br />[[Image:67-macprint3.png| 500x300px |macprint3.png]] | ||
# Click "Continue" | # Click "Continue" | ||
Revision as of 12:13, 27 February 2013

- Locate the printer you wish to add to your system and remember the name of the printer. In this example we will go with cp321111a which is located in building 321 room 111.
- Open "System preferences" (located in the "Applications" folder)
- Click "Print & Fax" which opens the dialog to add a printer. Click the '+' in the lower left corner to add a printer.
- At the top of the dialog popping up choose "WINDOWS" af the type of printer to add. Then specify the following paramters in the dialog:
- Domain: win
- Server: comp-winprint
- Authenticate: use your ID and Password as if you where connecting to the Portal
- You will then see a list of all printers connected to our network.
- Find the one you want to add, and click Add in the lower right corner of the Window.
- You can add the Location if you like.
- Print Using: Choose the driver for the specific model (if not available try and use the generic postscript driver)
- The server
- Click "add" and configure possible features for the printer (most often duplex)and set "Paper Matching" option to "Nearest Size & Scale"
macprint3.png - Click "Continue"


To see a video tutorial on how to add a printer click here
The printer is now added and ready to print to.