Difference between revisions of "OpenVPN"
| [unchecked revision] | [unchecked revision] |
(→Connecting using GUI) |
(→Windows) |
||
| (43 intermediate revisions by 3 users not shown) | |||
| Line 1: | Line 1: | ||
| + | <div style="background-color: #FFFF00; border-style: dotted;"> This guide is for users at '''DTU Compute''' only</div> | ||
| + | |||
| + | |||
| + | |||
=OpenVPN for users with an account at DTU Compute= | =OpenVPN for users with an account at DTU Compute= | ||
| Line 6: | Line 10: | ||
Here you will be presented with two options: | Here you will be presented with two options: | ||
| − | |||
| − | |||
Download new: should be used if don't already have a certificate or if you would like to block your previous certificate (revoke your old certificate) and get a new certificate. | Download new: should be used if don't already have a certificate or if you would like to block your previous certificate (revoke your old certificate) and get a new certificate. | ||
| + | |||
| + | Download current: should be used if you would like to redownload your existing certificate. E.g. if you would like to put it on multiple computers. | ||
==Linux== | ==Linux== | ||
| + | |||
| + | It is recommended that your OpenVPN files lives in a directory called '''.pki''' in your home (in Fedora Linux it is necessary), so create this dir first if it doesn't exist, and unzip here: | ||
| + | |||
| + | mkdir ~/.pki | ||
| + | unzip openvpn-abcd-2372ce1bea8340915a4129952a25a2d3235197d0.zip -d ~/.pki | ||
=== Connecting using commandline=== | === Connecting using commandline=== | ||
| − | + | cd ~/.pki/openvpn-abcd/ | |
| − | + | sudo openvpn DTU_Compute.ovpn | |
| − | sudo openvpn | + | |
===Connecting using GUI=== | ===Connecting using GUI=== | ||
| − | For the Gnome Desktop (Ubuntu / Pop_OS! / Fedora) install this package: | + | '''Note:''' For the Gnome Desktop (Ubuntu / Pop_OS! / Fedora) install this package first (may be installed already): |
network-manager-openvpn-gnome | network-manager-openvpn-gnome | ||
| + | '''Add a new connection''' | ||
* Open Network Settings | * Open Network Settings | ||
* Add a VPN connection | * Add a VPN connection | ||
| − | * | + | * Import from file |
| + | * Navigate (Ctrl + L) to ~/.pki/openvpn-abcd and select '''DTU_Compute.ovpn''' | ||
| − | |||
| − | + | [[File:Openvpn-settings1.png|400px]] | |
| − | + | ||
| − | + | ||
| − | + | ||
| − | + | ||
| − | + | ||
| − | + | ||
| − | + | ||
| − | + | ||
| − | + | ||
| − | + | ||
| − | + | ||
| − | + | ||
| − | + | ||
| − | + | ||
| − | | | + | |
| − | + | ||
| − | + | ||
| − | + | ||
| − | + | ||
| − | + | ||
| − | + | ||
| − | + | ||
| − | + | ||
| − | + | ||
| − | + | ||
| − | + | ||
| − | + | ||
| − | + | ||
| − | + | [[File:Openvpn-settings2.png|400px]] | |
| − | + | [[File:Openvpn-settings3.png|400px]] | |
| − | + | ||
| − | + | ===Verify VPN connection is working=== | |
| + | ====Web==== | ||
| + | https://vpn-test.compute.dtu.dk/ | ||
| − | + | The page should say "Success". | |
| − | then the VPN connection is working | + | ====SSH==== |
| + | You should be able to access DTU Compute internal servers via SSH. If successful then the VPN connection is working. | ||
| − | Or your can test that the VPN connection is working by opening a | + | ====SMB==== |
| + | Or your can test that the VPN connection is working by opening a File Manager window. Press CTRL-L and type | ||
smb://nas1.compute.dtu.dk | smb://nas1.compute.dtu.dk | ||
| Line 77: | Line 61: | ||
You will be prompted for: | You will be prompted for: | ||
| − | Username: Enter | + | Username: Enter you DTU username |
Domain: win | Domain: win | ||
Password: your password | Password: your password | ||
| − | If | + | If successful you will be able to see several shares. |
| − | == | + | ===Limit VPN connection to DTU=== |
| − | + | Make sure to limit the VPN access only to DTU resources, as otherwise all internet requests will be routed through the OpenVPN server. This is not sensible considering this may include streaming such as Youtube, Spotify, Netflix, etc. | |
| − | * | + | * Open Network Settings |
| + | * Select the VPN connection (the gear icon) | ||
| + | * Select the IPv4 tab, and check the "Use this connection only for resources on its network" | ||
| − | + | [[File:Openvpn-linux-ipv4.png|400px]] | |
| − | + | ||
| − | + | ===Removing an old config=== | |
| − | ''' | + | '''GUI''' |
| + | * Open Network Settings | ||
| + | * Select the old VPN connection (the gear icon) | ||
| + | * Click Remove VPN | ||
| + | '''Remove certs dir''' | ||
| + | rm -rf ~/.pki/openvpn-abcd | ||
| − | * | + | ==Windows== |
| + | * Visit https://openvpn.compute.dtu.dk and use your DTU initials to log in. | ||
| + | |||
| + | Here you will be presented with two options: | ||
| + | |||
| + | '''Download New''': should be used if don't already have a certificate or if you would like to block your previous certificate (revoke your old certificate) and get a new certificate. | ||
| + | |||
| + | '''Download Current''': should be used if you would like to redownload your existing certificate. E.g. if you would like to put it on multiple computers. | ||
| + | |||
| + | |||
| + | * Download the official OpenVPN Client for Windows: https://openvpn.net/community-downloads/ '''Note:''' Needs to be version 2.5.x | ||
| + | |||
| + | * Run the setup and follow the installation steps (default installation - no need to change options). Confirm the Windows security messages. | ||
| − | * | + | * Unpack the downloaded certs zip file and copy all files to the OpenVPN configuration folder: '''C:/Users/<username>/OpenVPN/config/''' (or this folder: '''C:/Program Files/OpenVPN/config/''') |
| − | * | + | * Run OpenVPN and double-click the icon in the task tray. Use DTU credentials to login. |
| Line 108: | Line 110: | ||
===Verify VPN connection is working=== | ===Verify VPN connection is working=== | ||
| + | ====Web==== | ||
| + | https://vpn-test.compute.dtu.dk/ | ||
| + | The page should say "Success". | ||
| + | |||
| + | ====Network Shares==== | ||
Type: | Type: | ||
| Line 121: | Line 128: | ||
\\nas1.compute.dtu.dk\winhome\your_username_here | \\nas1.compute.dtu.dk\winhome\your_username_here | ||
| − | Note: When prompted for a username/password, the username in that particular box must be prefixed with '''WIN\''' (e.g. "WIN\abcd") | + | Note: When prompted for a username/password, the username in '''that particular box''' must be prefixed with '''WIN\''' (e.g. "WIN\abcd") |
| − | == | + | ===Removing an old config=== |
| − | + | Delete the openvpn certs folder from where you placed it ('''C:/Program Files/OpenVPN/config/''' or '''C:/Users/abcd/OpenVPN/config/''') | |
| − | + | The connection is now gone as an option in the OpenVPN GUI. | |
| − | + | ==Mac== | |
| − | + | * Unzip the downloaded certs zip to any folder | |
| + | * Install '''Tunnelblick''' from [http://tunnelblick.net/ http://tunnelblick.net] | ||
| + | * Once installed - follow the Tunnelblick guides on How To Add a Configuration. Basically drag the '''DTU_Compute.ovpn''' client config to the Tunnelblick menu bar icon. | ||
| + | * Click on Tunnelblick icon in menu bar and connect using your '''DTU login'''. | ||
| − | + | ===Verify VPN connection is working=== | |
| − | + | ====Web==== | |
| − | + | https://vpn-test.compute.dtu.dk/ | |
| − | + | The page should say "Success". | |
| − | + | ====SSH==== | |
| + | You should be able to access DTU Compute internal servers via SSH. If successful then the VPN connection is working. | ||
| − | + | ====SMB==== | |
| − | + | Or you can try to connect to a network share: | |
| − | + | Use Finder - choose Go - ConnectToServer: '''smb://nas1.compute.dtu.dk''' | |
| − | + | ||
| − | + | ||
| − | + | ||
| − | + | ||
| − | + | ||
| − | + | ||
You will be prompted for: | You will be prompted for: | ||
| Line 158: | Line 163: | ||
If success you will be able to see several shares. If you should do anything wrong - or a new cetificate should be issued, just delete the connection and create a new one with the proper certificate etc. | If success you will be able to see several shares. If you should do anything wrong - or a new cetificate should be issued, just delete the connection and create a new one with the proper certificate etc. | ||
| + | |||
| + | ===Limit VPN connection to DTU=== | ||
| + | |||
| + | Make sure to limit the VPN access only to DTU resources, as otherwise all internet requests will be routed through the OpenVPN server. This is not sensible considering this may include streaming such as Youtube, Spotify, Netflix, etc. | ||
| + | |||
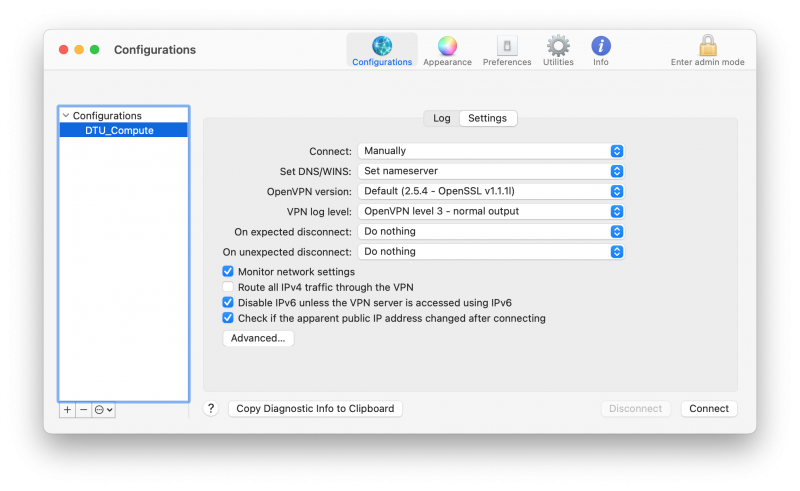
| + | * Click the Tunnelblick icon in the menu bar | ||
| + | * Select '''VPN Details...''' | ||
| + | * In the Configuration tab make sure the "Route all IPv4 traffic through the VPN" is not checked. | ||
| + | |||
| + | [[File:Tunnelblick_config.png|800px]] | ||
| + | |||
| + | ===Removing an old config=== | ||
| + | |||
| + | * Click the Tunnelblick icon in the menu bar | ||
| + | * Select '''VPN Details...''' | ||
| + | * With the configuration selected, in bottom left click the minus sign. Authorize the removal. | ||
| + | * Delete the certs folder you unpacked. | ||
==Android== | ==Android== | ||
Latest revision as of 14:36, 4 October 2023
Contents
OpenVPN for users with an account at DTU Compute
Download certificate
Visit https://openvpn.compute.dtu.dk and use your DTU initials to log in.
Here you will be presented with two options:
Download new: should be used if don't already have a certificate or if you would like to block your previous certificate (revoke your old certificate) and get a new certificate.
Download current: should be used if you would like to redownload your existing certificate. E.g. if you would like to put it on multiple computers.
Linux
It is recommended that your OpenVPN files lives in a directory called .pki in your home (in Fedora Linux it is necessary), so create this dir first if it doesn't exist, and unzip here:
mkdir ~/.pki
unzip openvpn-abcd-2372ce1bea8340915a4129952a25a2d3235197d0.zip -d ~/.pki
Connecting using commandline
cd ~/.pki/openvpn-abcd/
sudo openvpn DTU_Compute.ovpn
Connecting using GUI
Note: For the Gnome Desktop (Ubuntu / Pop_OS! / Fedora) install this package first (may be installed already):
network-manager-openvpn-gnome
Add a new connection
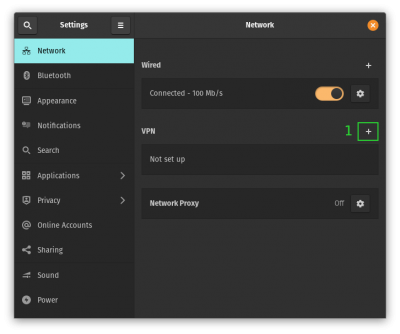
- Open Network Settings
- Add a VPN connection
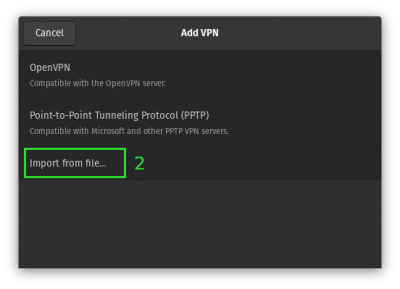
- Import from file
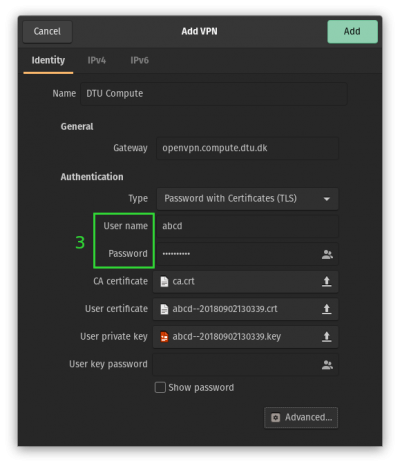
- Navigate (Ctrl + L) to ~/.pki/openvpn-abcd and select DTU_Compute.ovpn
Verify VPN connection is working
Web
https://vpn-test.compute.dtu.dk/
The page should say "Success".
SSH
You should be able to access DTU Compute internal servers via SSH. If successful then the VPN connection is working.
SMB
Or your can test that the VPN connection is working by opening a File Manager window. Press CTRL-L and type
smb://nas1.compute.dtu.dk
You will be prompted for:
Username: Enter you DTU username
Domain: win
Password: your password
If successful you will be able to see several shares.
Limit VPN connection to DTU
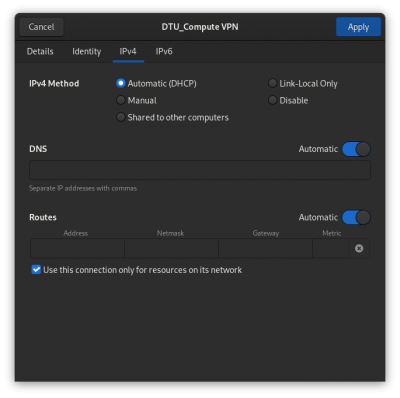
Make sure to limit the VPN access only to DTU resources, as otherwise all internet requests will be routed through the OpenVPN server. This is not sensible considering this may include streaming such as Youtube, Spotify, Netflix, etc.
- Open Network Settings
- Select the VPN connection (the gear icon)
- Select the IPv4 tab, and check the "Use this connection only for resources on its network"
Removing an old config
GUI
- Open Network Settings
- Select the old VPN connection (the gear icon)
- Click Remove VPN
Remove certs dir
rm -rf ~/.pki/openvpn-abcd
Windows
- Visit https://openvpn.compute.dtu.dk and use your DTU initials to log in.
Here you will be presented with two options:
Download New: should be used if don't already have a certificate or if you would like to block your previous certificate (revoke your old certificate) and get a new certificate.
Download Current: should be used if you would like to redownload your existing certificate. E.g. if you would like to put it on multiple computers.
- Download the official OpenVPN Client for Windows: https://openvpn.net/community-downloads/ Note: Needs to be version 2.5.x
- Run the setup and follow the installation steps (default installation - no need to change options). Confirm the Windows security messages.
- Unpack the downloaded certs zip file and copy all files to the OpenVPN configuration folder: C:/Users/<username>/OpenVPN/config/ (or this folder: C:/Program Files/OpenVPN/config/)
- Run OpenVPN and double-click the icon in the task tray. Use DTU credentials to login.
Verify VPN connection is working
Web
https://vpn-test.compute.dtu.dk/
The page should say "Success".
Type:
\\nas1.compute.dtu.dk
as the location in a window. If you see several shares, then the VPN connection is working.
If you want to access your private home directory, then type
\\nas1.compute.dtu.dk\home\your_username_here
or
\\nas1.compute.dtu.dk\winhome\your_username_here
Note: When prompted for a username/password, the username in that particular box must be prefixed with WIN\ (e.g. "WIN\abcd")
Removing an old config
Delete the openvpn certs folder from where you placed it (C:/Program Files/OpenVPN/config/ or C:/Users/abcd/OpenVPN/config/)
The connection is now gone as an option in the OpenVPN GUI.
Mac
- Unzip the downloaded certs zip to any folder
- Install Tunnelblick from http://tunnelblick.net
- Once installed - follow the Tunnelblick guides on How To Add a Configuration. Basically drag the DTU_Compute.ovpn client config to the Tunnelblick menu bar icon.
- Click on Tunnelblick icon in menu bar and connect using your DTU login.
Verify VPN connection is working
Web
https://vpn-test.compute.dtu.dk/
The page should say "Success".
SSH
You should be able to access DTU Compute internal servers via SSH. If successful then the VPN connection is working.
SMB
Or you can try to connect to a network share: Use Finder - choose Go - ConnectToServer: smb://nas1.compute.dtu.dk
You will be prompted for:
Username: Enter the same username that works for SunRay terminals and DTU Compute's Linux servers
Domain: win
Password: your password
If success you will be able to see several shares. If you should do anything wrong - or a new cetificate should be issued, just delete the connection and create a new one with the proper certificate etc.
Limit VPN connection to DTU
Make sure to limit the VPN access only to DTU resources, as otherwise all internet requests will be routed through the OpenVPN server. This is not sensible considering this may include streaming such as Youtube, Spotify, Netflix, etc.
- Click the Tunnelblick icon in the menu bar
- Select VPN Details...
- In the Configuration tab make sure the "Route all IPv4 traffic through the VPN" is not checked.
Removing an old config
- Click the Tunnelblick icon in the menu bar
- Select VPN Details...
- With the configuration selected, in bottom left click the minus sign. Authorize the removal.
- Delete the certs folder you unpacked.
Android
VPN will give you a VPN connection to DTU Compute's network. If you install apps for it, it can give you access to your files on the fileserver nas1.compute.dtu.dk with i.e. ES File Explorer or remote desktop access to a PC connected to DTU Compute's network, but it will not enable you to print to DTU Compute's printers (unless you find an app which can communicate with a CUPS printserver).
For Android 4 and 5 you can use The app OpenVPN Connect
- From a PC Connect to: https://openvpn.compute.dtu.dk and authenticate using DTUlogin. Click the Download link.
- Unpack the zip file and open the Windows folder
- Unpack the certs.zip file and copy the contents to your phone, you can use a cable - in the example they where copied to /sdcard0/Download. For Android 4.4 you need to enable 'display advanced devices' to access the folder.
Example setup with OpenVPN Connect:
Profile Name: Compute
Server Address: openvpn.compute.dtu.dk
Choose the certificates:
/storage/sdcard0/Download/client.openvpn
Username <your DTU windows login>
Password <enter your password>
Android versions before 4.0
The app FEAT VPN can be used for Android versions before 4.0. It does not require root and works with openvpn.
There is a free Lite version, which can run 1 hour a day and a paid version without limits which costs about 25 kr.
To set it up:
- From a PC connect to: https://openvpn.compute.dtu.dk and authenticate using DTUlogin. Click the Download link.
- Unpack the zip file and open the Windows folder
- Copy the certs.zip file to you phone
- Follow the instructions on the FEAT website for general setup and then add the tunnel following: http://www.featvpn.com/07-adding-and-editing-vpn-tunnels
Known problems: If you change between different wireless networks or between phone network and wireless, you may have to stop and start the service.
