Difference between revisions of "Git"
| [unchecked revision] | [unchecked revision] |
(→Disk space) |
(→Instructions for collaboration with user from outside DTU) |
||
| (122 intermediate revisions by 3 users not shown) | |||
| Line 1: | Line 1: | ||
| − | + | To use git for your own and team projects, DTU Compute is providing a GitLab instance with all the benefits it offers. Primarily a place for your repositories, other features are or will become available. | |
| − | |||
| − | If you don't have a | + | Login with your DTU credentials here: https://lab.compute.dtu.dk |
| + | |||
| + | |||
| + | == Add your public keys == | ||
| + | To access your private repositories, add your public SSH-key to your GitLab account.<br/> | ||
| + | If you don't have a SSH-key, on Linux/MacOS you can use this command in your favourite shell: | ||
| + | <pre style="background-color: #374048; color: white; border-style: none; padding: 5px; width: 75%;"> | ||
| + | ssh-keygen | ||
| + | </pre> | ||
| + | Windows 10 has a native SSH client; in PowerShell create a key pair with: | ||
| + | <pre style="background-color: #374048; color: white; border-style: none; padding: 5px; width: 75%;"> | ||
| + | ssh-keygen.exe | ||
| + | </pre> | ||
| + | Press <code>Enter</code> 3 times to create a password-less key pair, located in: | ||
<pre> | <pre> | ||
| − | ssh | + | $HOME/.ssh/id_rsa |
| + | $HOME/.ssh/id_rsa.pub | ||
</pre> | </pre> | ||
| + | The file <code>id_rsa.pub</code> is your public key that you can share with other systems, including DTU Compute's GitLab. | ||
| − | |||
| − | + | To add your public key in GitLab, follow these steps after login: | |
| − | |||
| − | + | 1) In the top-right corner click your user icon<br/> | |
| + | 2) Click '''Settings''' and on the left-hand panel click '''SSH Keys '''<br/> | ||
| + | 3) Follow the instructions from here<br/> | ||
| − | |||
| − | + | == Give access to other users == | |
| + | To share a repository with other users, the user you want to add has to login to GitLab first. Then you can find and add them as a member of your project. | ||
| − | |||
| − | + | 1) Select your project you want to share<br/> | |
| + | 2) In the left-hand panel select '''Settings -> Members'''<br/> | ||
| + | 3) Under '''Select members to invite''' search for the username<br/> | ||
| − | |||
| − | + | === Instructions for collaboration with user from outside DTU === | |
| + | Users can get access to Gitlab service at DTU Compute only if they have a DTU account. Therefore, if you’d try giving access to an external person through your Gitlab project/group settings, it will not work. | ||
| − | |||
| − | + | 1) Create a guest account for the external person by logging in to https://guest.dtu.dk with your DTU user and password.<br/> | |
| − | < | + | 2) After login in, you should see the options as in the figure below. Choose Create user.<br/> |
| − | + | <br/>[[File:Guestdtudk.png|800px]]<br/><br/> | |
| + | 3) You should see the form below appearing in the next screen. The username must consist of 8-9 symbols (only letters and digits are allowed). It is important to enable access to DTU Wireless system for Gitlab to be able to discover the new user.<br/> | ||
| + | <br/>[[File:Createguestuser.png|800px]]<br/><br/> | ||
| + | 4) After clicking Create user button, you should see the green success message and the information about the user appearing below the search box. You can edit, delete, and change the password for users. Note, that guest users are not able to change credentials themselves and you must do it for them.<br/> | ||
| + | 5) After certain amount of time (around 1-2 hours), notify the owners of the guest accounts that they should be able to sign in to Gitlab with their new credentials at the Gitlab logon page shown below. The credentials can be sent by email while changing user’s password.<br/> | ||
| + | <br/>[[File:Gitlab login guests.png|800px]]<br/><br/> | ||
| + | 6) You should now be able to share your group/project with your guest users by going to Members setting and clicking the blue Invite members button. The search box will appear where you can search guest users by their usernames in the usual way.<br/> | ||
| + | |||
| + | == Project Visibility & License == | ||
| + | New repositories are per default set to be '''private''' which means that only you, and members that you allow, are able to see and work with the repository. This can be changed to either '''internal''' (lab.compute.dtu.dk members) or '''public''' (visible to the whole internet). To change the visibility of a repository: | ||
| + | |||
| + | |||
| + | 1) Select '''Settings -> General'''<br/> | ||
| + | 2) Expand '''Visibility, project features, permissions''' and change '''Project visibility''' | ||
| + | |||
| + | |||
| + | '''NOTE:''' Please be aware that public repositories can be found in the <code>/public</code> access directory (https://lab.compute.dtu.dk/public). If you have projects here that are '''not''' meant to be public, change the visibilty of your repository! | ||
| + | |||
| + | If you do want your project to be public, we ask that you add a license. This can be done easily by clicking the '''Add license''' link beneath the project name in your project homepage. | ||
| + | |||
| + | |||
| + | == Mirroring repositories == | ||
| + | It may make sense to mirror a repository to/from an external source such as Github. For instructions read:<br/> | ||
| + | https://lab.compute.dtu.dk/help/user/project/repository/repository_mirroring.md | ||
| + | |||
| + | |||
| + | = Migrating from Gitolite to GitLab = | ||
| + | Our Gitolite server (git.compute.dtu.dk) is considered deprecated, and everyone with active repositories there are encouraged to migrate. This can be done from a local PC with a cloned repo. | ||
| + | |||
| + | Migrating a repo requires a bit of manual work, but not much. What it basically comes down to, is moving the ''origin'' from Gitolite to GitLab. Here are the steps described as simple as possible: | ||
| + | |||
| + | * Make sure your locally cloned repo - incl. all branches, tags, etc. - is up to date with ''origin'' | ||
| + | * Create a new repository on GitLab using the same name as the repo you want to move | ||
| + | * Add a new ''remote'' using the URL from GitLab, and push everything to this ''remote'' | ||
| + | * Remove all references to the old ''remote'' (Gitolite) | ||
| + | * Rename the new ''remote'' to ''origin'' | ||
| + | * In GitLab add the users you want to share the project with. | ||
| + | * Users may want to clone the repo anew rather than change ''origin'' manually. | ||
| + | |||
| + | == Steps described == | ||
| + | As is shown above, it is pretty straight forward to move a repository, but as always the details are important. Here the steps will be described a bit more together with the commands to use. | ||
| + | |||
| + | First make sure that your local repository clone is up to date with ''origin'' (the gitolite server), and make sure that you checkout all remote branches locally. | ||
| + | <pre style="background-color: #374048; color: white; border-style: none; padding: 5px; width: 75%;"> | ||
| + | git fetch origin | ||
| + | git branch -a | ||
| + | git checkout -b feature1 origin/feature1 | ||
</pre> | </pre> | ||
| − | |||
| − | + | Create the new replacement repository at https://lab.compute.dtu.dk and copy the SSH clone URL - eg. <code>git@lab.compute.dtu.dk:user/project2.git</code> - to add a new ''remote'' in your local repo, and push all branches to this new ''remote'', here called "new-origin". | |
| + | <pre style="background-color: #374048; color: white; border-style: none; padding: 5px; width: 75%;"> | ||
| + | git remote add new-origin git@lab.compute.dtu.dk:user/project2.git | ||
| + | git push --all new-origin | ||
| + | git push --tags new-origin # if you use tags | ||
| + | </pre> | ||
| + | |||
| + | Delete the reference to the old ''origin'' and make the new remote the origin. | ||
| + | <pre style="background-color: #374048; color: white; border-style: none; padding: 5px; width: 75%;"> | ||
| + | git remote rm origin | ||
| + | git remote rename new-origin origin | ||
| + | </pre> | ||
| + | |||
| + | Your repository is now migrated to GitLab. | ||
| + | |||
| + | |||
| + | = More to come = | ||
| − | + | ... | |
| − | + | [[Category:IT]] | |
Latest revision as of 16:44, 13 November 2023
To use git for your own and team projects, DTU Compute is providing a GitLab instance with all the benefits it offers. Primarily a place for your repositories, other features are or will become available.
Login with your DTU credentials here: https://lab.compute.dtu.dk
Contents
Add your public keys
To access your private repositories, add your public SSH-key to your GitLab account.
If you don't have a SSH-key, on Linux/MacOS you can use this command in your favourite shell:
ssh-keygen
Windows 10 has a native SSH client; in PowerShell create a key pair with:
ssh-keygen.exe
Press Enter 3 times to create a password-less key pair, located in:
$HOME/.ssh/id_rsa
$HOME/.ssh/id_rsa.pub
The file id_rsa.pub is your public key that you can share with other systems, including DTU Compute's GitLab.
To add your public key in GitLab, follow these steps after login:
1) In the top-right corner click your user icon
2) Click Settings and on the left-hand panel click SSH Keys
3) Follow the instructions from here
Give access to other users
To share a repository with other users, the user you want to add has to login to GitLab first. Then you can find and add them as a member of your project.
1) Select your project you want to share
2) In the left-hand panel select Settings -> Members
3) Under Select members to invite search for the username
Instructions for collaboration with user from outside DTU
Users can get access to Gitlab service at DTU Compute only if they have a DTU account. Therefore, if you’d try giving access to an external person through your Gitlab project/group settings, it will not work.
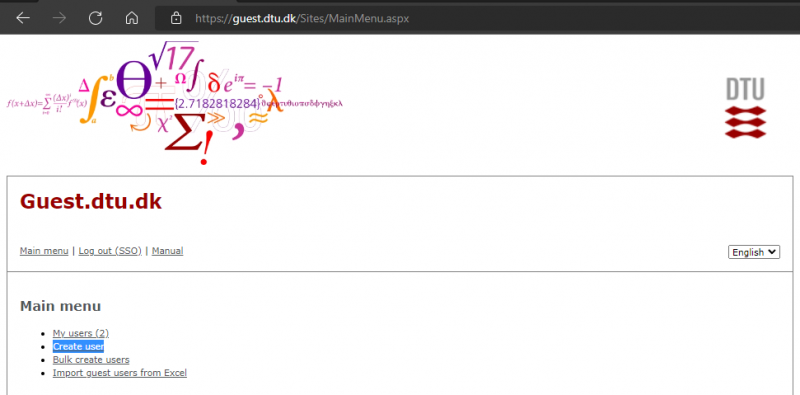
1) Create a guest account for the external person by logging in to https://guest.dtu.dk with your DTU user and password.
2) After login in, you should see the options as in the figure below. Choose Create user.

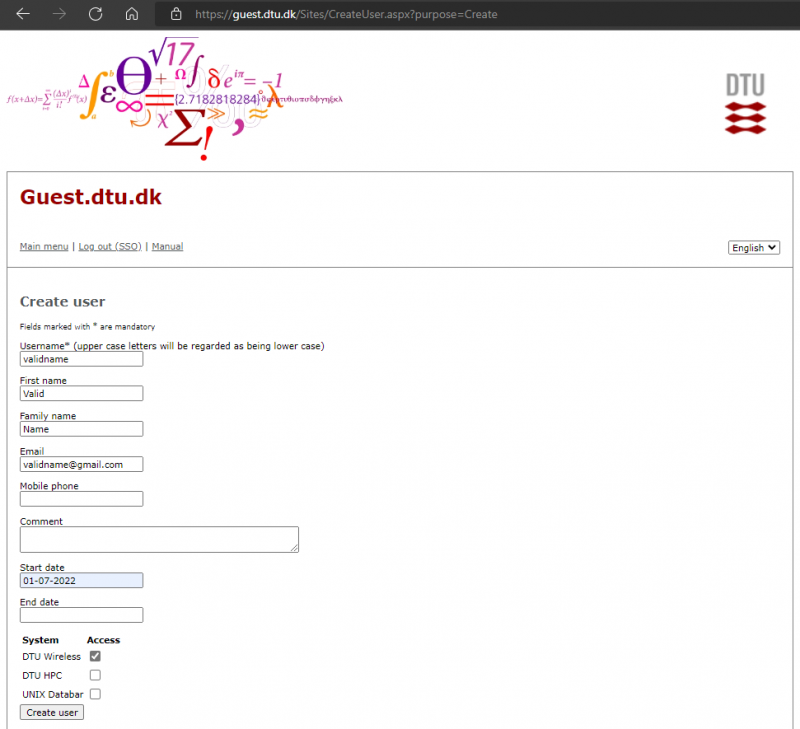
3) You should see the form below appearing in the next screen. The username must consist of 8-9 symbols (only letters and digits are allowed). It is important to enable access to DTU Wireless system for Gitlab to be able to discover the new user.

4) After clicking Create user button, you should see the green success message and the information about the user appearing below the search box. You can edit, delete, and change the password for users. Note, that guest users are not able to change credentials themselves and you must do it for them.
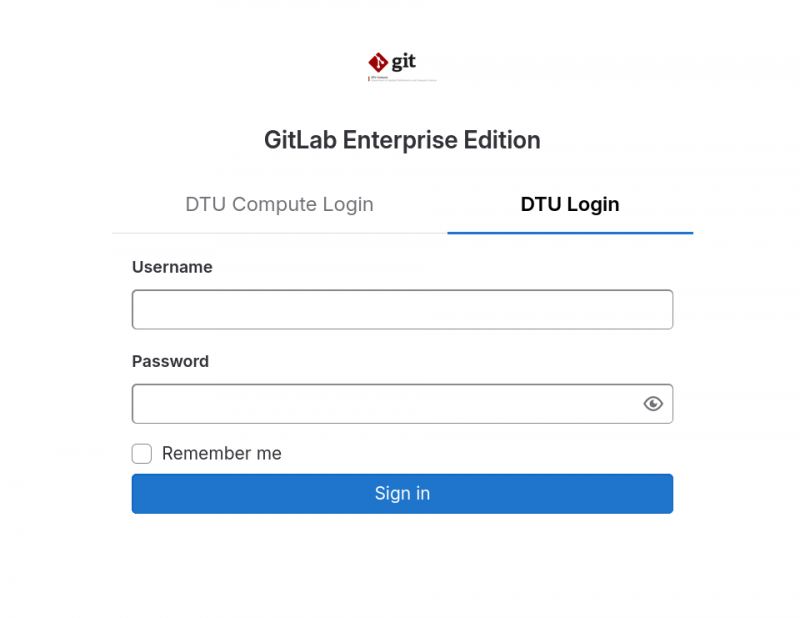
5) After certain amount of time (around 1-2 hours), notify the owners of the guest accounts that they should be able to sign in to Gitlab with their new credentials at the Gitlab logon page shown below. The credentials can be sent by email while changing user’s password.

6) You should now be able to share your group/project with your guest users by going to Members setting and clicking the blue Invite members button. The search box will appear where you can search guest users by their usernames in the usual way.
Project Visibility & License
New repositories are per default set to be private which means that only you, and members that you allow, are able to see and work with the repository. This can be changed to either internal (lab.compute.dtu.dk members) or public (visible to the whole internet). To change the visibility of a repository:
1) Select Settings -> General
2) Expand Visibility, project features, permissions and change Project visibility
NOTE: Please be aware that public repositories can be found in the /public access directory (https://lab.compute.dtu.dk/public). If you have projects here that are not meant to be public, change the visibilty of your repository!
If you do want your project to be public, we ask that you add a license. This can be done easily by clicking the Add license link beneath the project name in your project homepage.
Mirroring repositories
It may make sense to mirror a repository to/from an external source such as Github. For instructions read:
https://lab.compute.dtu.dk/help/user/project/repository/repository_mirroring.md
Migrating from Gitolite to GitLab
Our Gitolite server (git.compute.dtu.dk) is considered deprecated, and everyone with active repositories there are encouraged to migrate. This can be done from a local PC with a cloned repo.
Migrating a repo requires a bit of manual work, but not much. What it basically comes down to, is moving the origin from Gitolite to GitLab. Here are the steps described as simple as possible:
- Make sure your locally cloned repo - incl. all branches, tags, etc. - is up to date with origin
- Create a new repository on GitLab using the same name as the repo you want to move
- Add a new remote using the URL from GitLab, and push everything to this remote
- Remove all references to the old remote (Gitolite)
- Rename the new remote to origin
- In GitLab add the users you want to share the project with.
- Users may want to clone the repo anew rather than change origin manually.
Steps described
As is shown above, it is pretty straight forward to move a repository, but as always the details are important. Here the steps will be described a bit more together with the commands to use.
First make sure that your local repository clone is up to date with origin (the gitolite server), and make sure that you checkout all remote branches locally.
git fetch origin
git branch -a
git checkout -b feature1 origin/feature1
Create the new replacement repository at https://lab.compute.dtu.dk and copy the SSH clone URL - eg. git@lab.compute.dtu.dk:user/project2.git - to add a new remote in your local repo, and push all branches to this new remote, here called "new-origin".
git remote add new-origin git@lab.compute.dtu.dk:user/project2.git
git push --all new-origin
git push --tags new-origin # if you use tags
Delete the reference to the old origin and make the new remote the origin.
git remote rm origin
git remote rename new-origin origin
Your repository is now migrated to GitLab.
More to come
...