Difference between revisions of "Backup on Linux / OSX"
| [unchecked revision] | [unchecked revision] |
(→Linux client (does not work on MAC)) |
(→Using commandline) |
||
| (69 intermediate revisions by 5 users not shown) | |||
| Line 1: | Line 1: | ||
| + | <div style="background-color: #FFFF00; border-style: dotted;"> This guide is for users at '''DTU Compute''' only</div> | ||
| − | |||
| + | '''comp-backup.sh''' is a small script that configures an automatic and periodic backup of users' home directories - and other directories - on their Linux/macOS desktop and/or laptops. The script uses the 'rsync' command and synchronises the home directory against a remote backup directory on a dedicated server (''backup.compute.dtu.dk''). This server can also be used when you are not connected to the institute's network so you can maintain your backed-up files even when you are abroad. The remote directory will be backed-up to tape by our NetVault backup system. | ||
| − | |||
| + | <div style="background-color: #FF8888; border-style: dotted;"> Note: setup must be done while connected to DTU network or VPN connection</div> | ||
| + | After downloading the script (presumably to your Downloads folder), open a terminal and - as a user '''not root''' - run this: | ||
| − | + | <pre style="background-color: #374048; color: white; border-style: none; padding: 5px; width: 75%;"> | |
| + | bash Downloads/comp-backup.sh | ||
| + | </pre> | ||
| − | >> | + | * You will be asked for your DTU username - press <code>Enter</code> if the correct username is shown, otherwise type it in. |
| + | * You will most likely be prompted to enter your DTU password. | ||
| + | * Script should end with: ''Backup script installed'' - if not, please contact [mailto:itsupport@compute.dtu.dk IT Support] | ||
| + | * The automatic backup will start after next reboot. | ||
| + | * You can/should run the [[#Manual_backup|backup manually]] at this point, to make sure everything is OK. | ||
| + | * You will get a notification every time the backup succeeds or fails. | ||
| − | |||
| − | + | <div style="background-color: lightyellow; padding: 10px;"> | |
| + | Download: [https://lab.compute.dtu.dk/ITS/comp-backup/raw/master/comp-backup.sh comp-backup.sh] | ||
| − | + | (right-click -> save link as) | |
| + | </div> | ||
| − | |||
| − | |||
| − | |||
| − | + | =Backup Server= | |
| + | '''NOTE: ''<user>'' is your DTU username'''<br/> | ||
| + | To access/restore your backed up files, login to the server via 'ssh': | ||
| + | <pre style="background-color: #374048; color: white; border-style: none; padding: 5px; width: 75%;"> | ||
| + | ssh -i ~/.ssh/comp-backup-<user> <user>@backup.compute.dtu.dk | ||
| + | </pre> | ||
| + | This will place you in your <code>$HOME</code> on that server. | ||
| − | + | In the topfolder there will be a directory for the pc/laptop that you backed up using this script. Use 'scp', 'rsync' or 'sshfs' to copy files, or 'winscp' from Windows. | |
| − | + | ||
| − | = | + | =Files= |
| − | + | The script writes files in a few locations.<br /> | |
| − | = | + | Platform specific paths:<br /> |
| + | '''macOS'''<br /> | ||
| + | $CONF = $HOME/Library/<br /> | ||
| + | <code>$CONF/LaunchAgents/com.dtucompute.backup.plist</code><br /> | ||
| − | + | '''Linux'''<br /> | |
| + | $CONF = $HOME/.config<br /> | ||
| + | <code>$CONF/systemd/user/comp-backup-''<user>''.service</code><br /> | ||
| + | <code>$CONF/systemd/user/comp-backup-''<user>''.timer</code><br /> | ||
| − | + | '''common'''<br /> | |
| + | <code>$CONF/comp-backup-''<user>''/exclude</code><br /> | ||
| + | <code>$CONF/comp-backup-''<user>''/include</code><br /> | ||
| + | <code>$HOME/bin/comp-backup-''<user>''</code><br /> | ||
| + | <code>$HOME/.ssh/comp-backup-''<user>''</code><br /> | ||
| + | <code>$HOME/.ssh/comp-backup-''<user>''.pub</code> | ||
| − | + | =Configuration= | |
| + | ====include/exclude==== | ||
| + | By default the script '''include''' your $HOME and '''exclude''' some folders and file-types. This is defined in<br /> | ||
| + | <code>$CONF/comp-backup-''<user>''/exclude</code><br /> | ||
| + | <code>$CONF/comp-backup-''<user>''/include</code><br /> | ||
| + | You can use your favourite editor to customize these files.<br /> | ||
| + | Here is the default exclude list on Linux:<br /> | ||
| − | + | # Files to exclude | |
| + | /home/''<user>''/Downloads | ||
| + | /home/''<user>''/Music | ||
| + | /home/''<user>''/Videos | ||
| + | /home/''<user>''/anaconda* | ||
| + | /home/''<user>''/.conda | ||
| + | /home/''<user>''/.cache | ||
| + | /home/''<user>''/.local | ||
| + | *.vdi | ||
| + | *.vmdk | ||
| + | *.iso | ||
| − | + | For example, if you use Dropbox and don't want a backup of that, add the ''absolute path'' to your Dropbox folder to the exclude file: | |
| + | /home/''<user>''/Dropbox | ||
| + | If you used the previous backup script, you have these files: | ||
| − | + | $HOME/.myrzyncexclude | |
| + | $HOME/.myrzyncfiles | ||
| + | $HOME/.nisUserName | ||
| − | < | + | If you have edited them at one point, remember to update the new files with your customizations<br /> |
| + | Besides that, it is safe to remove these files. | ||
| − | + | ====Periodic backup==== | |
| + | By default the backup script will run every 3 hours. On Linux a backup will also be taken 5 minutes after bootup, whereas on macOS the first backup will be 3 hours after bootup. This assumes that a network connection is active, and that the machine is not in sleep/hibernation mode. | ||
| − | + | You can change the backup frequency by editing:<br /> | |
| + | on '''macOS'''<br /> | ||
| + | <code>$CONF/LaunchAgents/com.dtucompute.backup.plist</code><br /> | ||
| + | Change the ''StartInterval'' (in seconds) | ||
| + | <key>StartInterval</key> | ||
| + | <integer>10800</integer> | ||
| − | + | on '''Linux'''<br /> | |
| + | <code>$CONF/systemd/user/comp-backup-''<user>''.timer</code><br /> | ||
| + | Change the ''OnUnitActiveSec'' | ||
| + | OnUnitActiveSec=3h | ||
| − | + | ====Manual backup==== | |
| + | It is also possible to run a backup manually from a shell at any time, by running: | ||
| + | <pre style="background-color: #374048; color: white; border-style: none; padding: 5px; width: 75%;"> | ||
| + | comp-backup-<user> | ||
| + | </pre> | ||
| + | Note: The first time it is executed it might run for some time as it is copying all your files to the remote server. | ||
| − | + | =Restore from backup= | |
| − | + | ==Using commandline== | |
| + | SSH in to the backup server, and enter the folder named after your computer, and follow the path to your home folder. Here are the latest files from the last backup. If the file you want is deleted before a new backup was taken, it is also deleted on the backup server.<br /> | ||
| + | If this is the case, enter the hidden snapshot folder '''.zfs''' (Note: the .zfs folder is not visible when using <code>ls -la</code> and can not use tab-completion on this specific folder) and list the content: | ||
| + | <pre style="background-color: #374048; color: white; border-style: none; padding: 5px; width: 75%;"> | ||
| + | ssh user@backup.compute.dtu.dk | ||
| + | cd .zfs | ||
| + | cd snapshot | ||
| + | ls | ||
| + | </pre> | ||
| + | Find the date containing the file(s) you want to restore. Use '''rsync''' or '''scp''' to copy from the backup server. | ||
| − | + | ==Using a graphical program== | |
| − | + | Applications capable of working with SFTP (SSH File Transfer Protocol) can be used to access your backups on the server. For example: | |
| − | + | ||
| − | + | * WinSCP | |
| + | * Filezilla | ||
| + | * Cyberduck | ||
| − | If you | + | Enter the folder named after your computer, and follow the path to your home folder. Here are the latest files from the last backup. If the file you want is deleted before a new backup was taken, it is also deleted on the backup server.<br /> |
| + | If this is the case, enter the hidden snapshot folder '''.zfs''' by using your applications manual location entry (open directory), and then browse the snapshot folder.<br /> | ||
| − | ''' | + | '''Example using Cyberduck''': |
| − | + | [[File:Cyberduck_backup_sftp.png|800px]] | |
| + | [[File:Cyberduck_backup_zfs.png|800px]] | ||
| − | In the ''' | + | =Notes= |
| + | ==macOS== | ||
| + | In macOS Catalina and newer, it is necessary to allow <code>bash</code> full disk access for the backup-script to work. This is done in the '''System Preferences''' -> '''Security & Privacy''' -> '''Privacy''' tab | ||
| − | + | Unlock to make changes and click the + sign. A Finder open dialog will appear, and press <code>Shift Command G</code> to get a location bar where you type in <code>/bin/bash</code> | |
| − | + | [[File:SP backup-script.png|800px]] | |
| − | + | ==Old backup server== | |
| − | + | The backup script prior to August 2020 is pointing to the server '''userbackup1.compute.dtu.dk''' and the backed up files are still present here. This server is considered to be deprecated though, so by downloading the script above it will use the new backup server. | |
| − | + | ||
| − | |||
| − | |||
| − | |||
| − | |||
| − | |||
| − | |||
| − | |||
| − | |||
| − | |||
| − | |||
| − | |||
| − | |||
| − | |||
| − | |||
| − | |||
| − | |||
| − | |||
| − | |||
| − | |||
| − | |||
| − | |||
| − | |||
| − | |||
| − | |||
| − | |||
| − | |||
| − | |||
| − | |||
| − | |||
| − | |||
| − | |||
| − | |||
| − | |||
| − | |||
| − | |||
[[Category:Backup]] | [[Category:Backup]] | ||
Latest revision as of 14:19, 7 October 2022
comp-backup.sh is a small script that configures an automatic and periodic backup of users' home directories - and other directories - on their Linux/macOS desktop and/or laptops. The script uses the 'rsync' command and synchronises the home directory against a remote backup directory on a dedicated server (backup.compute.dtu.dk). This server can also be used when you are not connected to the institute's network so you can maintain your backed-up files even when you are abroad. The remote directory will be backed-up to tape by our NetVault backup system.
After downloading the script (presumably to your Downloads folder), open a terminal and - as a user not root - run this:
bash Downloads/comp-backup.sh
- You will be asked for your DTU username - press
Enterif the correct username is shown, otherwise type it in. - You will most likely be prompted to enter your DTU password.
- Script should end with: Backup script installed - if not, please contact IT Support
- The automatic backup will start after next reboot.
- You can/should run the backup manually at this point, to make sure everything is OK.
- You will get a notification every time the backup succeeds or fails.
Download: comp-backup.sh
(right-click -> save link as)
Contents
Backup Server
NOTE: <user> is your DTU username
To access/restore your backed up files, login to the server via 'ssh':
ssh -i ~/.ssh/comp-backup-<user> <user>@backup.compute.dtu.dk
This will place you in your $HOME on that server.
In the topfolder there will be a directory for the pc/laptop that you backed up using this script. Use 'scp', 'rsync' or 'sshfs' to copy files, or 'winscp' from Windows.
Files
The script writes files in a few locations.
Platform specific paths:
macOS
$CONF = $HOME/Library/
$CONF/LaunchAgents/com.dtucompute.backup.plist
Linux
$CONF = $HOME/.config
$CONF/systemd/user/comp-backup-<user>.service
$CONF/systemd/user/comp-backup-<user>.timer
common
$CONF/comp-backup-<user>/exclude
$CONF/comp-backup-<user>/include
$HOME/bin/comp-backup-<user>
$HOME/.ssh/comp-backup-<user>
$HOME/.ssh/comp-backup-<user>.pub
Configuration
include/exclude
By default the script include your $HOME and exclude some folders and file-types. This is defined in
$CONF/comp-backup-<user>/exclude
$CONF/comp-backup-<user>/include
You can use your favourite editor to customize these files.
Here is the default exclude list on Linux:
# Files to exclude
/home/<user>/Downloads
/home/<user>/Music
/home/<user>/Videos
/home/<user>/anaconda*
/home/<user>/.conda
/home/<user>/.cache
/home/<user>/.local
*.vdi
*.vmdk
*.iso
For example, if you use Dropbox and don't want a backup of that, add the absolute path to your Dropbox folder to the exclude file:
/home/<user>/Dropbox
If you used the previous backup script, you have these files:
$HOME/.myrzyncexclude
$HOME/.myrzyncfiles
$HOME/.nisUserName
If you have edited them at one point, remember to update the new files with your customizations
Besides that, it is safe to remove these files.
Periodic backup
By default the backup script will run every 3 hours. On Linux a backup will also be taken 5 minutes after bootup, whereas on macOS the first backup will be 3 hours after bootup. This assumes that a network connection is active, and that the machine is not in sleep/hibernation mode.
You can change the backup frequency by editing:
on macOS
$CONF/LaunchAgents/com.dtucompute.backup.plist
Change the StartInterval (in seconds)
<key>StartInterval</key>
<integer>10800</integer>
on Linux
$CONF/systemd/user/comp-backup-<user>.timer
Change the OnUnitActiveSec
OnUnitActiveSec=3h
Manual backup
It is also possible to run a backup manually from a shell at any time, by running:
comp-backup-<user>
Note: The first time it is executed it might run for some time as it is copying all your files to the remote server.
Restore from backup
Using commandline
SSH in to the backup server, and enter the folder named after your computer, and follow the path to your home folder. Here are the latest files from the last backup. If the file you want is deleted before a new backup was taken, it is also deleted on the backup server.
If this is the case, enter the hidden snapshot folder .zfs (Note: the .zfs folder is not visible when using ls -la and can not use tab-completion on this specific folder) and list the content:
ssh user@backup.compute.dtu.dk
cd .zfs
cd snapshot
ls
Find the date containing the file(s) you want to restore. Use rsync or scp to copy from the backup server.
Using a graphical program
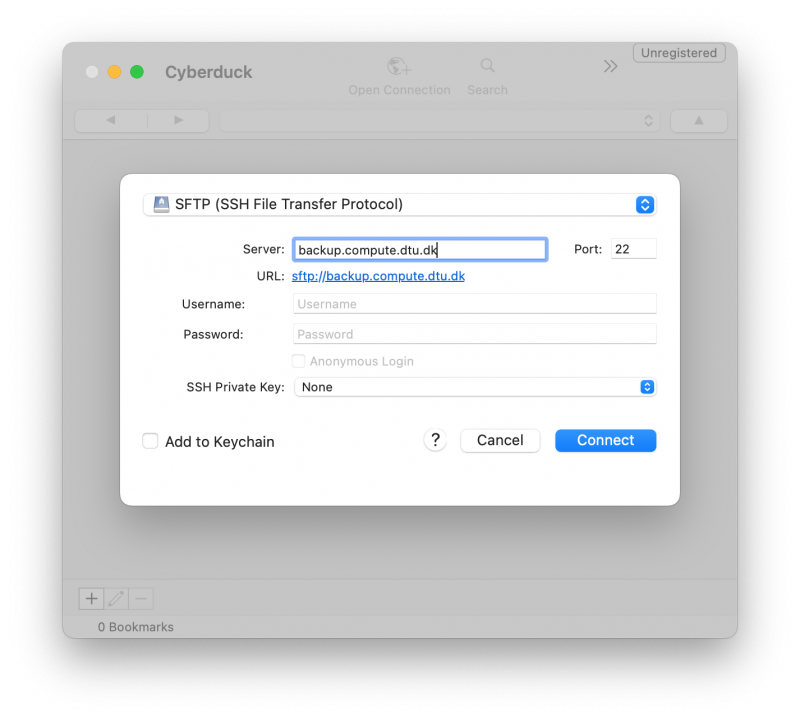
Applications capable of working with SFTP (SSH File Transfer Protocol) can be used to access your backups on the server. For example:
- WinSCP
- Filezilla
- Cyberduck
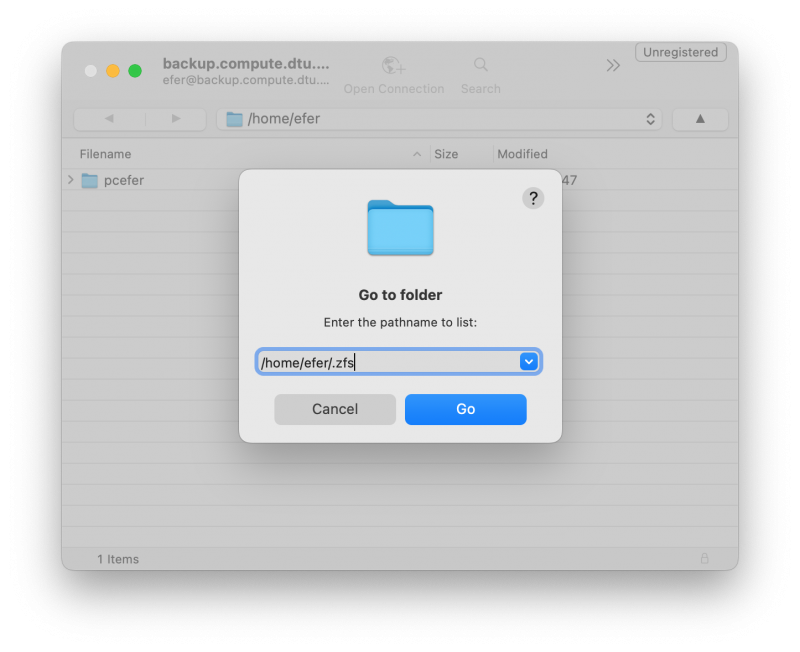
Enter the folder named after your computer, and follow the path to your home folder. Here are the latest files from the last backup. If the file you want is deleted before a new backup was taken, it is also deleted on the backup server.
If this is the case, enter the hidden snapshot folder .zfs by using your applications manual location entry (open directory), and then browse the snapshot folder.
Example using Cyberduck:
Notes
macOS
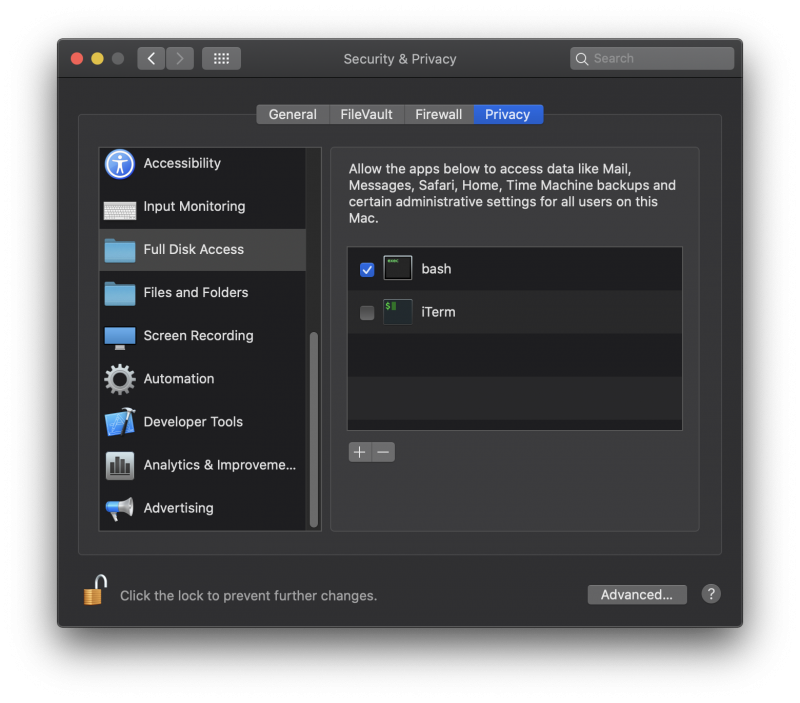
In macOS Catalina and newer, it is necessary to allow bash full disk access for the backup-script to work. This is done in the System Preferences -> Security & Privacy -> Privacy tab
Unlock to make changes and click the + sign. A Finder open dialog will appear, and press Shift Command G to get a location bar where you type in /bin/bash
Old backup server
The backup script prior to August 2020 is pointing to the server userbackup1.compute.dtu.dk and the backed up files are still present here. This server is considered to be deprecated though, so by downloading the script above it will use the new backup server.


